|
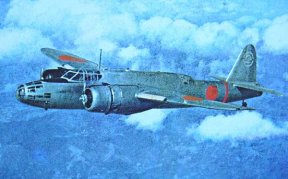
Helen
- The Dragon Thunder In
Hasegawa´s 1/72 range of Japanese army bombers which kits were released
at the end of the last millenium there was also the Nakajima Ki-49 Donryu.
It had taken many years to make a new kit and to replace the old Japanese
Revell one. |
|
|||
|
I´m afraid I´ve never seen the Revell´s Ki-49 therefore I´m not able to compare each to other. My experiences with Japanese Revell kits are only the best. The proof of this opinion are kits such as Nakajima J1N1 Gekko or Kawasaki Ki-45 Toryu. I liked both very much, especially their very patiently done rivets which many famous and worldwide known firms haven´t been able to make even at present time, either. Because I like the Japanese WW II planes in 72nd scale there is no wonder the Ki-49 has also been caught in my gunsight. Before (and during) working on it I had to study various literatute describing this plane and to compare their photographs both with the kit parts and two camouflage schemes which Hasegawa offer. It was the reason why I discovered Hasegawa done a mistake. According to kit CP 10 instruction leaflet it shall be the Ki-49-I version. Camouflage schemes are being offered for two a/c belonging to Hamamatsu Flying School, both of them in natural metal finish. Propellers of these a/c are equipped with spinners and there is a large window in the port side of the fuselage although a quite known color photo of an a/c shows clearly that spinners are ommited and the window is smaller in its shape and overwhelmed by hinomaru. I dug up all later Ki-49´s were equipped with spinners and photos of some Ki-49-I trainers depict that some of them had the spinners removed. Most training (perhaps all) aircraft suffered this way and there exist photos showing also missing undercarriage doors and wheel covers. Hasegawa offer both markings for Ki-49-I whereas the kit is very close to be Ki-49-IIb. However, the oil coolers placed below engines seem to be smaller in the kit than versions Ki-49-IIb had. My conclusion is the CP 10 kit is a „mutation“ both Ki-49-I and II versions. The kit was obviously intended for issue in two versions, the Ki-49-I which came out first as CP10 and the Ki-49-II which followed the first one as IIa modification, CP12. Consequences of this manufacturer´s decision might drive some modellers mad (like me) because mistakes for each variant have been done in detail such as the the Ki-49 rear fuselage windows. Furthermore, I couldn´t check if the propeller blades are correct for Ki-49-II version. I haven´t had a suitable three view plan unfortunately. I wonder if the kit includes slightly broader propeller blades which were Ki-49-IIa being equipped with. Another
trouble began when I was looking for a suitable camouflage scheme. I was
confused for the second time because I had decided to create my model in
all metal finish. I found
out that later Ki-49-II
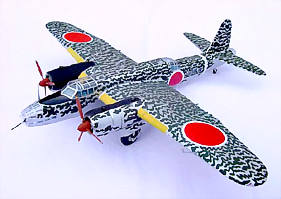
planes were mostly camouflaged or wore hasty spotted green camouflage on
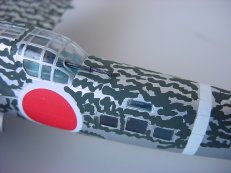
grey. However, was it grey colour in fact? I think they might have worn
spotted camouflage on a natural metal surface. My conclusion for the
affirmation is simple. Planes being left in natural metal wore black
anti glare panels in front of canopy and on the inner surfaces of engine
covers.
The
same anti glare panels are seen in pictures of planes painted with
spotted camouflage. So, my question is: „If the planes were in grey
on all surfaces why they wore anti glare panels?“ I guess there
was no reason to apply black anti glare panels on a flat grey
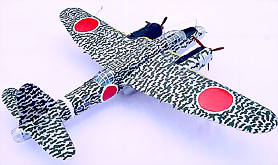
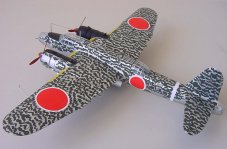
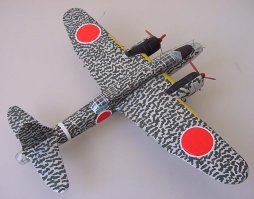
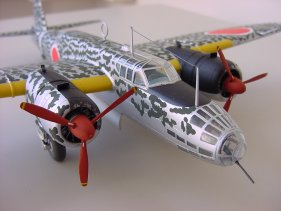
camouflaged surface so I have done green spots on NMF. The wheel wells are very simple with no inner structure and firewall. Looking forward we can see the back side of the engine. To make the inner areas of wheel wells more realistic it will be better to use a bulkhead cut from a styrene sheet which we glue into the rear part of engine nacelles. Wheel legs and retracting mechanism look well therefore we don´t have to improve them. The interior of wheel wells as well as legs and wheel discs shall be in silver colour. I think it is correct. You might be surprised unpleasently like me when you try to set the engine nacelles to the wing. There is a wide gap between them and you have to glue them together carefully. The worse job is joining the wings to fuselage. You will surely have to use a putty to fill gaps in. It is no suitable manner when you decide to paint your model in silver because every incorrectness caused by sanding is seen on the silver surface. Trying to place the nose glazing cone I found out it didn´t copy well the front fuselage oval shape whereas the canopy, upper and rear fuselage turret coverings did. It was quite easy to set them in place. What I should do else than to take a tube with putty and sandpaper into my hands again and to make the front of fuselage correct. And which plane I´ve chosen? Studying an article from old Scale Modeller magazine, a monography on the Ki-49 published in the vol.7 No.1 January 2001 JAS Jottings, its author´s personal explanation and a Czech book deals with Japanese aircraft I´ve added to my collection of Japanese planes the one assigned to 61st Sentai, New Guinea,1943. |
|
|||
|
Accordind to Mr.Ian Baker´s opinion who is an Australian historician specialized in Japanese wartime planes it is quite possible that Ki-49 wore spotted green camouflage in this manner, especially later in the war. This was also applied to other types of Japanese Army aircraft and nowadays it is very difficult to tell from black/white photos whether the base colour was grey or the plane was left unpainted. |
||||
|
Anyway, the kit has been constructed straight from the box. As usually I started with interior. The pilot´s area is very simple. Because the lack of photos of the inside equipment in available sources I didn´t do any arrangements here. At this point we could discuss about the interior color. The instruction leaflet lets us know entire fuselage inside areas shall be in metallic blue but what about to use the greenish-grey Mitsubishi interior green being produced by Aeromaster? The decision which shade of them to choose is up to you. When all work described above had been done I started painting the kit. I used a spirit diluted silver paint from a Czech firma Agama and applied it on the entire model with an airbrush, of course. Before I started applying the paint I had overcoated all clear parts with Maskol from the same firm to protect them from the paint. Although I usually don´t use a brush to paint models I did it in this case because I had to handpaint the green spots consequently they were also applied at Japanese Army Air Force combat units by personel hands. I painted them around the hinomaru which had been applied before I started painting the spots. If I did it vice versa the spots would be both seen under the red "meatballs".
|
||||