How to construct the HASEGAWA´s Lockheed P-38L Lightning in 48th scale?
Lightning On My Bench
Written by Jaroslav KUBAT
Intro.
Sometimes every modeller longs for having an unusual model in his
collection. It might be a resin kit, vacuformed kit or classic kit in an
unusual camouflage scheme or with everything close up. My choice was the
P-38 Lightning, in my eyes one of the most beautiful planes of WW II. This
choice was easy, but it was more difficult to choose between P- 38 from
Hasegawa and P-38 from Academy. Finally, I elected the Hasegawa kit for
its better details. This article isn’t an instruction on how to do it,
or even a descriptions of the plane, but it is only a description of my
work. Therefore there aren’t any description of colour details here.
Start
of work
Cockpit.
I bought a P-38 detail set
from Verlinden to make my work easier. The cockpit was really the only
place where the Verlinden helped me . However, I had to use some parts of
the Eduard, because some parts of the Verlinden, for example the
dashboard, are worse than the original injection moulded parts of the
Hasegava.
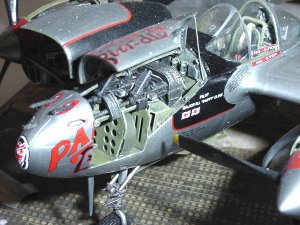
Gun bay.
It was the first place where I crashed. What is offered by Verlinden is
far from reality.Only the front half of this part was useful. The rear
half was made from the Pavla models and I changed the guns for super guns
from Aires. The magazines were mirror reversed so I had to improve them. I
made new Gun bay cowers– vacuformed, because the Verlinden set contained
only one, which I couldn’t straighten well.
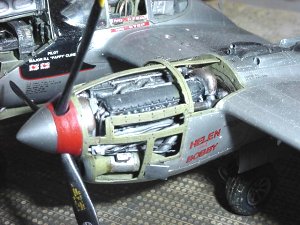
Engine.
An another huge problem became when I tried to use a Verlinden engine.
You must be a magician if you want to make it work. If a miracle
happened and you made it work, this isn’t any a time for celebration.
The engine was probably calculated for another kit, maybe for 1/32 scale.
The odds are, that for Hasegava P-38
in 1/48 scale, the engine was unusable. This engine has
only 11 exhaust pipes, in contrast to a real engine, which has 12
exhaust pipes, but this problem became irrelevant ,because I had to buy a
new engine. In the very nick of time CMK made an engine which was correct
for this model. Engine holders, exhaust strokes, coolers, pies and wires
were made from plastic profiles, sheets and wires.
Wing
and fuselage
Assembly
Spraying
time
Final
works.
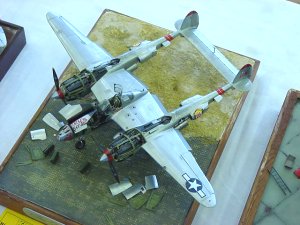
After the spraying time I
stuck on the control surfaces, flaps, covers and others details. Under the
wing I hung only fuel tanks, because, unfortunately, I have never seen
this plane with rockets. Finally
I did the weathering and a final dope. The drama was over, and what can I
say in conclusion. Perhaps only warning, warning to all, who are
speculating on buying this Verlinden set on the P-38 for all that read
this article. On the box of the set is also written, that it is for
experienced modellers, indeed more faithful would be: The set is for
horror lovers or masochists.
Reference:
Detail & Scale P- 38
part 2, P-
38 In action,
Replic magazine,
HPM magazine, APKR magazine,
Web sites
Kit:
Hasegava P- 38L
Detail
parts: Verlinden P- 38 updated,
Eduard P-38 photo etch. parts,
True Detail wheels,
Aires Browning 12,7 gun set,
Pavla Models P-38 guns,
CMK Alison engine
Decals:
Aeromaster " Lightning in the sky" part 3