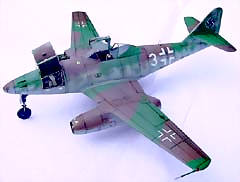
The one-seat Swallow
Libor Malý
The swallow is a small, black, fast and nice bird. Its speed and shape of its body gave the Messerschmitt factory constructors an idea to set a nickname for the first jet fighter used in World War II in combat. The Messerschmitt Me-262 plane looked really like the bird and its speed as well. The aircraft was constructed both in one-seat and two-seat nightfighter version. Although there wasn´t the lack of suitable kits of the Me-262 in 72nd scale also the Revell firm had came out kits of both Me-262 A and B versions about two years ago. My opinion is the Revell kits are the best ones in comparison to other producers which are being made kits of this type, even to Hasegawa therefore it was the reason to make a decision to put my built Me-262´s from Matchbox and Smer out from a shelf and to change them for a Revell kit. Unfortunately, I´ve never seen how the Hasegawa kit of Me-262 looks like (there hasn´t been a reason for its examining) so I haven´t been able to compare its quality to the Revell but considered the Revell´s one might be better.
I bought a one-seat version and started working on it. According to a
rule as soon as a new kit is made there is usually released a resin or photo
etched set very soon I could go for various sets which were suitable for
improving the Revell kit. All of them were made in the Czech Republic. Most of
them is being produced by the CMK firm which makes four resin sets. We can
choose from some simplier ones which are sold separately. There are being
offered interior (cockpit) sets Cat.No. 7017 for „A“ version and 7018 for
version „B“, Cat.No. 7004 gun bay (armament) set, Cat.No.7005 engine set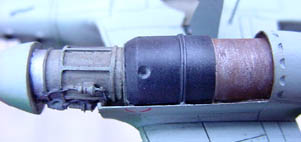 and set Cat. No. 7012 for control surfaces of the plane´s framework (flaps and
ailerons). We can also obtain a conversion set Cat. No. 7007 for A1a/U3 and
A2a/U2 modifications. Putting some of the sets to one box there was created a
detail complementary set including components as follows.
An instruction leaflet showing the placement of the all the resin or
metal parts and their colours as well and including camouflage drawings for two
Czechoslovak C-92 (PL-01) and CS-92 (V-31) planes, a decal sheet for both
Czechoslovak versions and metal parts for some instruments in the cockpit.
Indeed, the „B“ nightfighter version antennas included. We find here also
two vacuum-formed canopies (we might spare one of them when we are careful with
their cutting and setting in place). Two small plastic bags include resin parts
for all the moving controls, twin-seater cockpit area devices, nose guns, both
(!) opened engines
and set Cat. No. 7012 for control surfaces of the plane´s framework (flaps and
ailerons). We can also obtain a conversion set Cat. No. 7007 for A1a/U3 and
A2a/U2 modifications. Putting some of the sets to one box there was created a
detail complementary set including components as follows.
An instruction leaflet showing the placement of the all the resin or
metal parts and their colours as well and including camouflage drawings for two
Czechoslovak C-92 (PL-01) and CS-92 (V-31) planes, a decal sheet for both
Czechoslovak versions and metal parts for some instruments in the cockpit.
Indeed, the „B“ nightfighter version antennas included. We find here also
two vacuum-formed canopies (we might spare one of them when we are careful with
their cutting and setting in place). Two small plastic bags include resin parts
for all the moving controls, twin-seater cockpit area devices, nose guns, both
(!) opened engines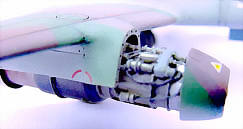 and their coverings and rear fuselage wheel wells bulkhead. Only one notice from
me – be careful during setting No. PUR 12 parts in place. You probably will
not be able to set them as they shall be (like me).
and their coverings and rear fuselage wheel wells bulkhead. Only one notice from
me – be careful during setting No. PUR 12 parts in place. You probably will
not be able to set them as they shall be (like me).
When we are decided to buy only sets No. 7017 or 7018 for cockpit we must bear on mind they are constructed for the Směr/Heller kit. It might be a reason why the rear bulkhead placed to wheel bays doesn´t set well (it is shorter a bit and we have to use a filler to fill holes between the bulkhead and fuselage halves). My decision was to use seperately sold sets for my Me-262A with omiting the flaps one. Replacing the moving parts of wings and tail with using the resin ones seemed me unnecessary to do. Because of the decision to omit the resin moving parts I knew later I had spared hours of my building time and could put it in working on other kits which I would like to finish sooner than I was not able to do anything common to modelling in my old age…
It´s only a pity
there hasn´t been produced any resin set for main undercarriage wells yet. 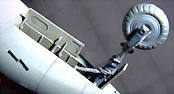 The
lack of it has been solved particularly by Extratech firm. They offer a
photo etched set which can be used for improving of the wheel wells. The other
chance is to use an Eduard set but most of its parts we will not need due to all
the resin sets are better and work with them goes much more easily than with
brass. All the mentioned sets are really suitable and their using will help you
to improve the model appearance. There is only necessary to use some wires to
create electric wiring and connection cables being laid in the nose guns
compartment. The same problem we should have to resolve for inner spaces of the
nose and main undercarriage wheel wells.
The
lack of it has been solved particularly by Extratech firm. They offer a
photo etched set which can be used for improving of the wheel wells. The other
chance is to use an Eduard set but most of its parts we will not need due to all
the resin sets are better and work with them goes much more easily than with
brass. All the mentioned sets are really suitable and their using will help you
to improve the model appearance. There is only necessary to use some wires to
create electric wiring and connection cables being laid in the nose guns
compartment. The same problem we should have to resolve for inner spaces of the
nose and main undercarriage wheel wells.  Fortunately,
there is a lot of colour photos of real aircraft taken in museums worldwide at
Internet so it is sufficient to download them, print them and examine them
well. Using a super glue, a tweezer together with skilled hands and patience
will lead you to succesful creating of the wiring and plumbing mismatch.
Fortunately,
there is a lot of colour photos of real aircraft taken in museums worldwide at
Internet so it is sufficient to download them, print them and examine them
well. Using a super glue, a tweezer together with skilled hands and patience
will lead you to succesful creating of the wiring and plumbing mismatch.
I usually don´t use
decal sheets included in a kit so in case the Me-262 I decided to use a
Propagteam decal sheet for finishing my model. The sheet offers two camouflage
schemes. The first one is for Heinz
Bär mount and the second one is „white 3“ belonging to Adolf Galland. Both
of them are in standard Me-262 pattern and consist from RLM 81/83/76 shades with
RLM 81 and 83 mottling on fuselage sides. For masking the upper surfaces being oversprayed
on a real plane in the splinter pattern scheme I used a Eduard mask for the
first time. I had often to check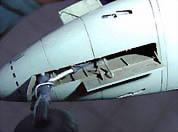 its right placement to avoid a relevant mistake in colouring because the
instruction leaflet drawing is too small and it sometimes is quite difficult to
recognize all positions of the mask parts. Finally, I had overcome troubles
succesfully and could
finalize my Swallow with weathering. I always use a black chalk powder method
which I apply with a brush into engraved panel lines. This method is quick and
results are acceptable. When the area where the powder is
applied seems to be much dark I simply wipe the powder off with wet finger. If
you want you can overspray entire model with a varnish to fix the powder.
its right placement to avoid a relevant mistake in colouring because the
instruction leaflet drawing is too small and it sometimes is quite difficult to
recognize all positions of the mask parts. Finally, I had overcome troubles
succesfully and could
finalize my Swallow with weathering. I always use a black chalk powder method
which I apply with a brush into engraved panel lines. This method is quick and
results are acceptable. When the area where the powder is
applied seems to be much dark I simply wipe the powder off with wet finger. If
you want you can overspray entire model with a varnish to fix the powder.
One more notice should be said in relation to masking. My advice to modellers is if you´re persuaded you are able to make a hand made self-adhesive mask try it because doing it will be better than using the Eduard one. You can use Tamiya masking tape for example. Although you might don´t spare the time you save your money and the result is the same, maybe even better. It is obvious the original Eduard mask is thicker than Tamiya so it doesn´t set well in some places especially on curved shapes of a model. Indeed, it´s up to you to make right decision.
Happy modelling!