The
Mustang
Boeing B-17F Flying Fortress, Academy 1/72
Just for many years I´ve been interested in plastic modelling of World War II aircraft. Enjoying U.S. planes especially my aim is to complete a collection both army and navy combat aircraft which fought in the sky of the Pacific area. There was the last one from the heavy bombers range in my stock that I haven´t built yet, the Boeing B-17 Flying Fortress. Consequently, to do my collection more complete, I decided to start assembling it. I used a kit in version F from ACADEMY in 72 nd scale. Sorry, quarter scale modellers, I still don´t have to make kits in bigger scale because my eyes are O.K. although I wear glasses. In spite of a lot of greyish hair I´m able to hold tweezers and another usefull tools strongly in my hands. But how long yet?
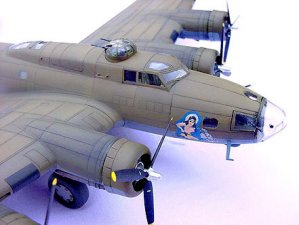
The kit which I chose was stowed in a large box with a banal drawing on the top. Inside the box I found few styrene bags with assembly parts. There are over 90 parts made from grey plastic and 28 clear ones. We don´t use all the parts because there are also ones for earlier B-17 versions. We spare four propellers, horizontal stabilizer, engine cowlings, bomb bay bulkheads and door, ventral gondola and some pilot´s compartment parts. The kit offers marking for a B-17F-65-BO called „Fort Alamo II“ from European theatre which served in the 840th Bombardment Squadron therefore I had to improvize with a different marking for a plane from South West Pacific area. The SQUADRON SIGNAL book „Pride of Seattle“ by Steve Birdsall helped me a lot with searching a suitable scheme. The book describes the first 300 B-17F planes and there are some side views in colour showing planes from SWPA. I went for a plane „The Mustang“ which belonged to 43rd Bomb Group. I like nude dames as nose arts but as real persons they´re better. I´m persuaded many scale modellers will agree with me, won´t they?
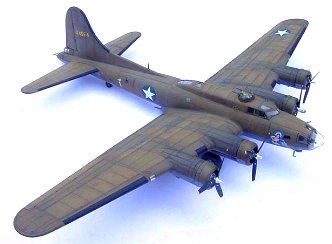
Because of fact that according to my knowledge there isn´t any manufacturer of a decal sheet for the plane which I chose in the world in 72nd scale I had to handpaint nose art. It´s a reason why it doesn´t look well. Of course, I recognized later that Hasegawa had released in their nose art series the B-17F kit in the same marking that I chose. They´ve forced me to ask them for the decal sheet, then. My experience is that it is worth to try even the value of the sheet you can pay in IRC´s. Well, the nose art doesn´t look well yet but my friends say the surface of the model does. I tried to do the surface weathered such as many photos depict. I used various shades of olive drab for upper surfaces and neutral grey for undersides for this activity. AEROMASTER paints of shades olive drab No.1040, olive drab faded No.1041, neutral grey No.1043 and No.1049 interior green helped me a lot. Before spraying the paints with an airbrush I oversprayed the whole model with silver paint from a Czech firm called AGAMA. The paint can be spirit diluted and it is being sold in small jars. When I used it for the first time I was surprised with result. The paint is dry for a few minutes and surface looks like a real aluminium skin. The purpose why I did it is simple. Silver shade can show you every mistake on the surface which has been caused by grinding a putty or glue. Before applying camouflage paints I oversprayed all the engraved panel lines with rust paint to create more wear and tear effect and applied camouflage paints. When paints were dry I put decals. You might be surprised because I never use any decal set or sol. I suffice myself with a gloss clear only. I always spray the clear on a place where will be a decal applied. After drying the clear I slide a decal off , put it in place, press water up and let it dry. Finally I overspray whole model with AEROMASTER or MODEL MASTER flat clear. My experience is that the MODEL MASTER product being sold in small bags seems to be better than the first one, but... I recommend to use a thinner in ratio more than 50% during clear diluting and to spray it in a very thin layer. My last experience is that thicker layer may cause turning the surface to grey. In the end, for more realistic surface effect on B-17 I got black engraved lines and engine and exhaust areas with using a black chalk powder which I applied with a small brush.
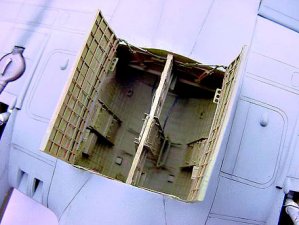
For improving a look of the model I used EDUARD´s photo etched metal parts which are included in sets No.72-170 (bomb bay), 72-171 (undercarriage) and 72-172 (interior). I omitted the fourth set which is being made by Eduard. The set includes flaps and I decided to use flaps by PARAGON. I persuaded myself later it was a bad decision. PARAGON´s product doesn´t look very realistic, ribs are very strong and moving parts of flaps are bend a bit. I had also to sand off the back side of the upper parts to make them as thiner as much it was possible. I had to work carefully to avoid sanding through the back side to ribs. I replaced also engines with using resin ones which a Czech firm called KUBAT used to purchase. It´s a pity that he has stopped his production because there aren´t many firms that produce Wright Cyclone engines in 72nd scale worldwide.
So, how were things with building the kit? It is accurate in its size and shape. However, a few changes must be done. At first, access door on the starboard side of the rear part of fuselage must be cut into plastic. At second, the astrodome on the top of the nose must be removed and two small windows in front of pilot´s cabin must be cut out. Good help for this work are photos on page 18 of the Squadron Signal book mentioned in this article. When you will check the photos also note that The Mustang´s propeller blades aren´t marked with stencils showing a manufacturer´s logo and propeller hubs are in natural metal finish.
Photo etched parts by EDUARD were used according to instructions and no part left (how come!?). It sometimes happens me that some parts I´m not able to place as an instructions leaflet shows. Working with metal parts went well in spite of their quite big amount. I think the most difficult is to make oil tanks in their right shape and to place them into main undercarriage wheel wells. I was also afraid with machine guns but finally I was satisfied with results. You must be only careful with setting machine guns to a place in the rear part of fuselage. There is only one chance to place them accurately on a very thin rod. It happened me that one of them suddenly had disappeared in the fuselage... and rests inside forever. Fortunately, a CMK set helped me with making a new machine gun. Photo etched parts also improve a look of wheels wells, whole interior – both front and rear section of fuselage and exterior. However, if you will look at a real plane at Duxford museum, for example, you won´t be satisfied with equipment of wheel wells. There are lots of wires and plumbing inside them. I think only a few very skilled modellers will be able to do it exactly. I didn´t try it at all. And what about the soft surface of kit parts? There are lots of recessed rivets on the surface of a real plane so they should be visible on the kit surface even in 72nd scale! But it might be theme for a next article...